Implementing Fortis Payments
Before going live and starting to process payments with Fortis, a few simple steps must be completed, though not necessarily in a specific order:
- Engage with Retail Realm to open a project so we can ensure this is the correct solution for your business.
- Install MAX Pay Global for Business Central.
- Engage with Fortis Payments.
- Obtain test and live credentials from Fortis. You may have these if you are already a Fortis customer.
- Configure MPG for a test account.
- Begin testing, using Fortis test card numbers and tags.
- When you are ready to go live, configure MPG for your live account credentials.
- Perform an end-to-end test.
- Go live into production.
- Receive hypercare support from Retail Realm and Fortis for the first week (or more) of running payments.
Information Required from Fortis
Before you can setup MAX Pay Global for Business Central with Fortis, you must have a Fortis account. This chapter details the steps you must complete and information you must have available in order to configure MAX Pay Global.
Onboard with Fortis
Apply for an account here: https://developer.sandbox.zeamster.com/
You will require the following items. These are available from the Fortis portal as directed:
|
Item |
Navigation |
|
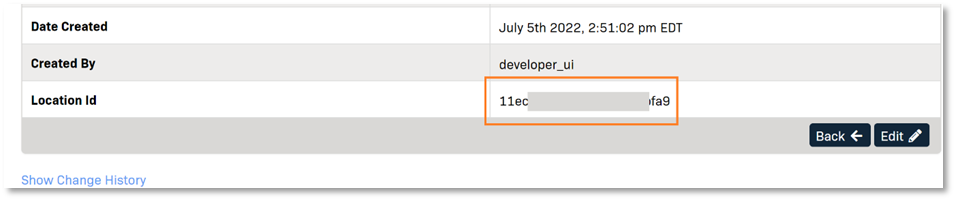
Location Id |
Dashboard > Locations > Edit Location > Location ID |
|
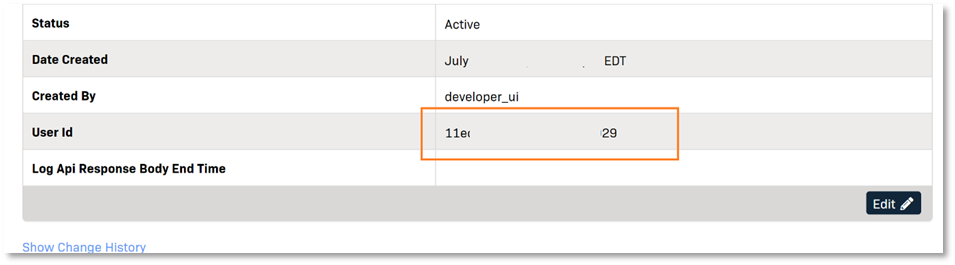
User Id |
Dashboard > Settings > Users > Edit user> User id |
|
User Api key |
Dashboard > Settings > Users > New user User api key |
|
CC product transaction id |
CC product transaction id Obtain this from your Fortis representative |
Location id
Navigate to Dashboard > Locations > Edit Location > Location ID
User id
Navigate to Dashboard > Settings > Users > Edit user
User api key
Dashboard > Settings > Users > New user

The Api key is only viewable at the time of creation.