MPOS Installation (Legacy)
|
🛈 Important This topic applies only Commerce Retail Modern POS and Deployable packages that were built for Retail SDK |
This topic describes the proceed to manually install and configure the Retail Modern POS application. In practice, many of these steps are automated by pre-setting configuration settings into the MPOS Package. Installation is often automated through various deployment tools, both Microsoft and third party.
Pre-requisites
It is vital that any previous version of Retail Modern POS is uninstalled and completely removed from the device, prior to commencing.
Please check that there are no files existing in the following folder:
C:\Program Files (x86)\Microsoft Dynamics 365\70\Retail Modern POS
Installation Procedure
- In Dynamics 365 Headquarters, navigate to
Retail and commerce > Channel setup > POS setup > Devices - Set Activation status to Pending
- Set the Application type to Retail Modern POS
- Under Register package, choose the package to download (see Package types below)
- Select Download > Download | Retail Modern POS
- Select Download > Download | Configuration file
- From the download folder, right-click on the package executable and choose Run as Administrator
- Install the application (but do not run), providing any information and authentication that may be required.
- Navigate to the installation path of MPOS and open the ClientBroker folder
(e.g. “C:\Program Files (x86)\Microsoft Dynamics 365\70\Retail Modern POS\ClientBroker) - Open (as Administrator) the file HardwareStation.Dedicated in Notepad and beneath the <composition> tag, insert:
<add source="assembly" value="RR.PaymentDevice" />
i.e.

- Save and Close the file
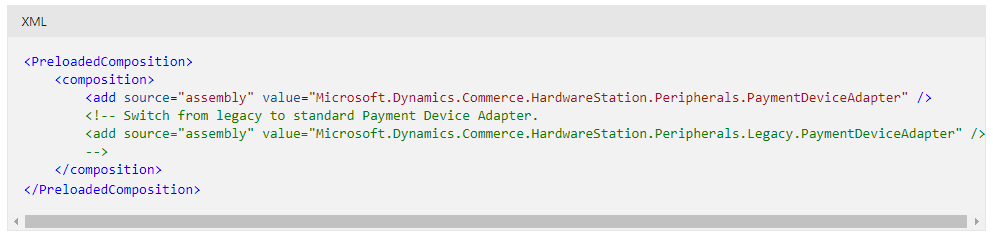
Update the Modern POS configuration file
- From the same path, open the file dllhost.exe.config in Notepad
- Update the PreloadedComposition section as shown here, to switch from the legacy payment device adapter to the standard payment device adapter.
- Save and close the file
Update the AAD credentials
- From the same path, open the file dllhost.exe.config
- Update the AADClientId and AADRetailServerResourceID keys with the values for your organization.

- For instructions on how to obtain these key values, please refer to this article:
- Save and close the file
Activation and first-time use
- Start the Retail Modern POS application
- Follow the on-screen prompts to activate the device (you may need the activation URL and Cashier logon credentials)
- Select Hardware station
- Select Manage
- Turn on the local hardware station
- Log out of the POS
- Log into the POS
- Try a test transaction (Pay card). For instructions on how to do this, see the Chapter Using MAX Pay Global
Installation tips for first time installations
- Checkpoint: After completing step 8, check that the MPOS package includes the Retail Realm payment DLLs. Navigate to the installation path of the Retail Modern POS application and navigate to the Client broker folder. (e.g. C:\Program Files (x86)\Microsoft Dynamics 365\70\Retail Modern POS\ClientBroker)
- Check that in addition to the standard Microsoft DLL files (from an out of the box installation), there are DLLs provided by Retail Realm: e.g.
- RR.Retail.Security.dll
- RR.PaymentDevice.dll
- RR.Utility.dll
- Multiple dll files: RR.Dynamics.Retail.Payment.*.dll
(where * is the name of the Payment provider) - When following the above instructions to update the AAD credentials, ensure you do this prior to trying to activate the MPOS.
- When making changes to the configuration files, before starting Retail Modern POS, kill the Task Manager process ComSurrogate(32bit) (dllhost.exe)
For further information, please contact Retail Realm support.
See also:
https://docs.microsoft.com/en-us/dynamics365/commerce/retail-modern-pos-device-activation